Azure DevOps YAML Queueing Policy
One important concept when setting up a continuous deployment pipeline is to make sure your deployments happen in the order you would expect them to, in alignment with your repositories commit history.

Generally this quite simple to achieve if you have a low frequency of commits and a short pipeline execution time, as it will typically finish before the next PR is merged or commit is made into the trunk branch of code. However, for repositories with a high commit frequency or a pipeline with variable run times could cause issues with serialising pipeline runs.
ℹ️ Since posting, there has been an update to add sequential deployments to the exclusive lock check. This provides most, but not all feature parity to classic releases.
In Azure DevOps this concept is handled in the classic release pipelines using the concept of Queueing Policies.
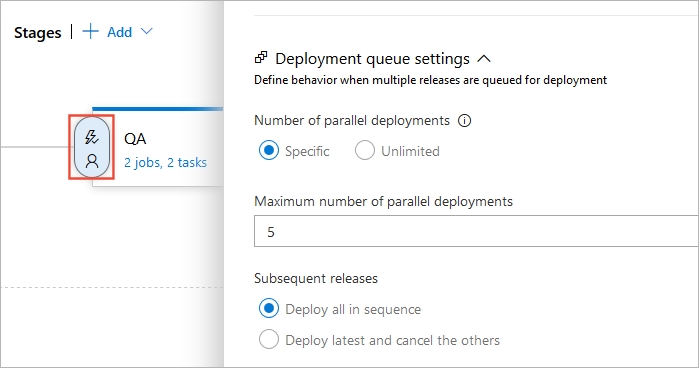
This allows you to set the number of parallel deployments and the sequencing, which works great. However, classic release pipelines are a thing of the past as YAML pipelines allow you store your build and release pipeline definitions as code, along side your application. This is a common practice in a lot of CI systems and Azure DevOps implementation is also very similar. The trade-off to using YAML pipelines over classic releases in Azure DevOps is that there is not currently full feature parity, and queueing policies is one of these missing features

There is a feature request in the developer community to add this functionality. However, it seems that it's not being picked up anytime soon. For the time being we have to look for alternative solutions!
Alternatives
Simple options
If you are only using a single job/stage, this becomes less of an issue, as you can simply set a demand/capability to ensure to ensure exclusivity.
Alternatively if you are using multi-stage pipelines, but are happy with pressing a button, you can leverage Approvals to choose which run to approve first.
If these options aren't automated or flexible enough for you, carry on reading!
Environments + Exclusive lock
Environments are a fairly new concept in Azure DevOps, and typically represent a collection of resources which can be targeted as part of a pipeline. These are specified as part of a deployment job, an example definition of this is below:
- stage: deployment
  jobs:
  - deployment: Deploy_App
    displayName: Deploy to Dev Environment
    environment: Dev-Cluster
    strategy:
      runOnce:
        deploy:
          steps:
          - script: do deployment
The keyword here is environment which connects or creates if it does not exist to an environment in Azure DevOps UI.
With environments you can additionally add Approvals & Checks to add additional logic or requirements prior to running the job and is evaluated at the beginning of the stage. One of these are an Exclusive Lock
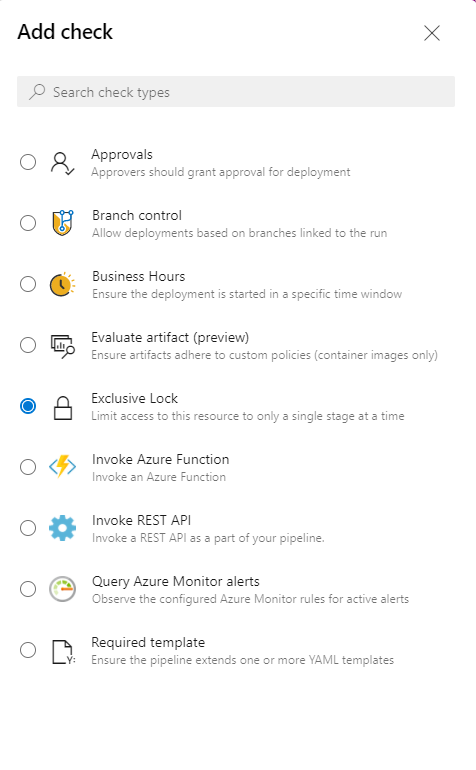
Here you can specify that only one pipeline stage may utilise the lock at a time. It does specify in the warning when selected that all subsequent queued stages will be cancelled. However, this is not the behaviour observed currently. Instead it will queue up the other runs until the lock is released.
Using the exclusive lock achieves the goal of ensuring only a single deployment can happen at a time. But this does not guarantee the execution order. If the pipelines have a prior build stage that has a variable time to complete, a build queued after the first, could obtain the lock before the first build was triggered, causing the order to be incorrect. An alternative method will need to be used if we want to guarantee execution order.
Logic inside the pipeline
One option could be to add logic inside the pipeline to list the current list of runs in the current pipeline and add a loop/wait condition to not proceed the step until the current execution is at the front of the queue. This would look similar to the below:
steps:
- script: |
    check_run () {
      az pipelines runs list \
      --project $(System.TeamProject) \
      --pipeline-ids $(System.DefinitionId) \
      --branch $(Build.SourceBranch) \
      --status inProgress \
      --query-order QueueTimeAsc \
      --top 1 \
      --query "[].id" \
      -o tsv | tr -d "\r"
    }

    while [ "$(Build.BuildId)" -ne "$RUN" ]
    do
      sleep 30
      RUN=$(check_run())
    done
This method works well, as it guarantees the execution order of the pipeline based on the order of the queued pipelines. However, this approach requires you to setup the azure cli and devops extension beforehand and additionally, you would also need to think about gracefully failing after a period of time or number of retries.
Using An Agentless Task
This option uses a combination of methods from the previous two, combining Environments and utilising the Azure DevOps API to evaluate the pipeline queue.
Firstly, you require setting up a Service Connection to act as an endpoint to call the Azure DevOps api.
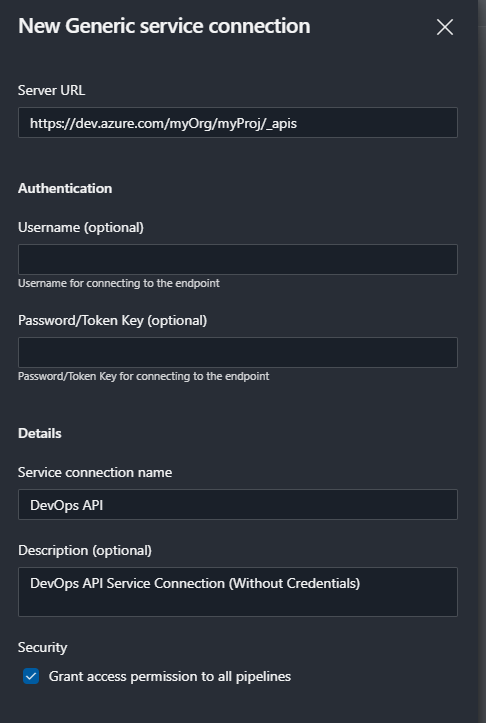
This will need to point to the Organisation/project you currently use. We will then use this as the URL base to connect to.
Next you will need to target an environment in your deployment job.
- stage: deployment
  jobs:
  - deployment: Deploy_App
    displayName: Deploy to Dev Environment
    environment: Dev-Cluster
Then in the environments section of Azure DevOps, create the environment if it does not exist, then open the Approvals and Checks section.
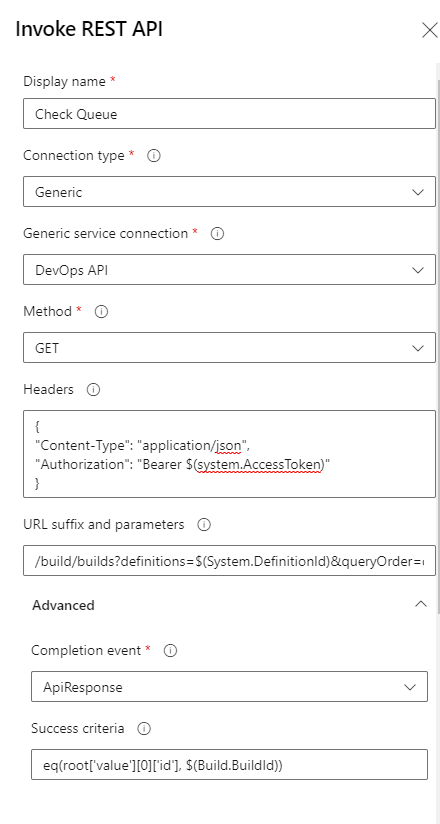
Here we will specify the Invoke REST API task and specify the following information:
-
Display Name: Check Queue (or any other name you wish)
-
Connection Type: Generic
-
Generic Service Connection: DevOps API (Or the name of the Service Connection created earlier)
-
Method: GET
-
Headers:
{
  "Content-Type": "application/json",
  "Authorization": "Bearer $(System.AccessToken)"
} -
URL suffix and parameters:
/build/builds?definitions=$(System.DefinitionId)&queryOrder=queueTimeAscending&$top=1&statusFilter=notStarted,inProgress,cancelling -
Completion Event: ApiResponse
-
Success Criteria:
eq(root['value'][0]['id'], $(Build.BuildId))
You can also then specify the control options to add a timeout and wait period between evaluations if it fails.
This should then look similar to the below:
Then when the pipeline runs, it will evaluate this check, prior to running the stage. This will ensure that the current run is the oldest in the queue before proceeding. Additionally it can gracefully fail after a certain time or number of retries.
Summary
Hopefully this provides a few alternatives to the classic release pipelines queueing policy. I'd like to see this functionality will be brought into YAML pipelines in a more simpler form in the future!